Class Flow
Setting Up and Talking About Mini Pies
Begin by showing children:
• the pie crust (already rolled),
• a small jar or bowl of cherry filling,
• a heart-shaped cutter and lollipop sticks.
Explain that today they will make tiny pies on sticks, like little gifts.
Talk briefly about the oven and that only adults handle it.
Making the Egg Wash
Children watch (or help) as the educator:
1. cracks an egg into a small bowl,
2. adds a teaspoon of water,
3. whisks until smooth.
Kids can:
• help count: “One egg, one spoon of water,”
• observe color and texture changes,
• smell the egg mixture (optional) and hear that this will make pies shiny and golden.
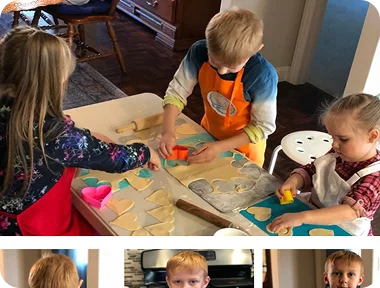
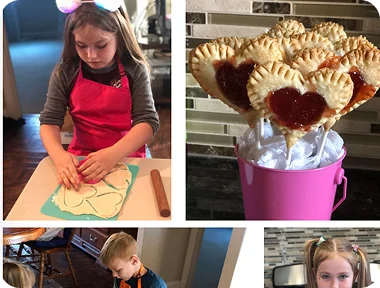
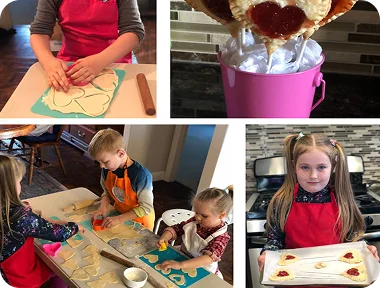
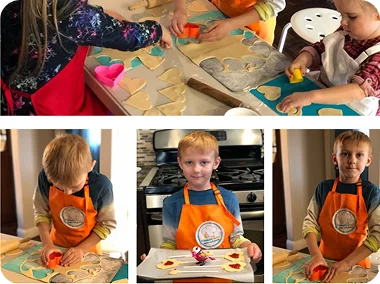
Cutting Heart Shapes
Unroll the first pie crust:
• Show children how to gently smooth it out.
• Let them press the heart-shaped cutter into the dough.
Children:
• practice lining up cutters to fit as many hearts as possible (spatial awareness),
• press down strongly enough to cut through,
• lift out the first 10 hearts and place them on the lined baking sheet.
You can ask:
• “How many hearts do we have now?”
• “Can you find a spot for one more heart?”
Adding Sticks and Filling
With the hearts on the tray:
1. Brush the edges of each heart lightly with egg wash — explaining that this works like “glue” for dough.
2. Place a lollipop stick so that one end sits in the center of the heart, pointing down like a handle.
3. Invite children to spoon about 1 tablespoon of cherry filling onto the center of each heart (not too close to the edges).
This step develops:
• spoon control (how much filling),
• awareness of space (leave a border for sealing),
• and lots of sensory language: red, shiny, sticky, sweet-tart.
Adding the Top Hearts and Sealing with a Fork — the Highlight
Unroll the second crust:
• Cut 10 more hearts with the same cutter.
• Place one heart on top of each filled base.
Now children:
• gently press around the edges with their fingers first,
• then use a fork to press all around the heart, making a crimped pattern.
This step is wonderful for:
• fine-motor precision,
• rhythm (tap-tap-tap with the fork),
• cause and effect: “When we press the edges, the filling stays inside.”
Finishing Touches and Baking
Before baking:
1. The educator carefully cuts tiny slits in the top of each pie pop to let steam escape (or demonstrates once, then lets older kids try under supervision).
2. Children brush the tops with egg wash, giving the pies a shiny “coat.”
Then:
• The adult places the tray into the preheated 425°F (220°C) oven.
• Children watch from a safe distance or imagine what is happening inside.
While the pie pops bake, talk about:
• how steam tries to escape,
• why we make slits,
• how dough changes color and texture in the oven.
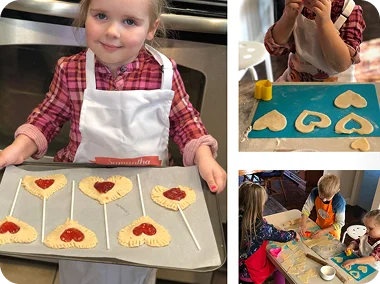
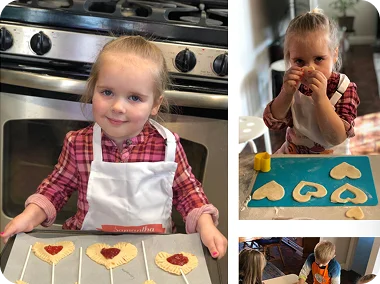
Cooling, Admiring, and Sharing
After 14–16 minutes, when the pops are golden and puffed, the educator removes them from the oven and transfers them to a cooling rack.
Children:
• notice the color change: pale dough → golden brown,
• see how the edges hold the filling inside,
• feel (with supervision) that they must wait until the pies cool before eating — a good lesson in patience and safety.
Once cooled:
• Each child chooses a pie pop,
• Holds it by the stick — like a lollipop, but made of pie,
• Shares with classmates or packs one to take home.
You can invite a mini reflection:
• “What part was your favorite — cutting hearts, adding sticks, sealing with a fork, or brushing tops?”
• “Who would you like to share your pie pop with?”
Notes & Creative Extensions
• Use different shaped cutters (stars, circles, flowers) for themed classes.
• Sprinkle a little sugar on top of the egg wash for extra sparkle and crunch.
• Try other fillings: apple, blueberry, peach, or jam, checking school allergy and sugar policies.
• Have children decorate sticks with paper flags or name tags after baking.
• Connect with literacy: write or draw a “Cherry Pie Pop Recipe Card” together, using simple pictures and words.
Perfect For Educators
• Preschool teachers
• Kindergarten classrooms
• Early-childhood centers
• Montessori / Reggio Emilia programs
• Homeschooling families
• Cooking clubs
• Summer parties and picnics
• Family workshops
Skills Developed:
sealing dough, shaping with cutters, fine-motor precision, hand–eye coordination, understanding baking time and safety, sequencing steps, measuring small spoonfuls, patience while cooling, pride and independence in creating a personal treat.


 ICONIER Digital Agency